Sunday, April 22, 2007
Leaving Animation Mentor for a while
Well... it has been a hard decision, but I will leave AM for a while to deal with all that moving to California implies. So many things are going on in my life right now that I can not put my 100% on the assignments so I decided it was best if I just concentrate now on my big change and then continue with my short film.
My new demo reel
I selected just what I think are my best animation clips, because as they say: a demo reel is as good as the worst of the clips.

Tuesday, January 16, 2007
Class1-3 Progress Reel
Well, here is the My latest Progress Reel. It includes everything form class 1 to class 3 in reversed order. The last assignment "Line of dialog" is a work in progress because the facial animation will be done in class 4.
I hope you like it.
Thanks to all my mentors and fellow students for all the help!
I hope you like it.
Thanks to all my mentors and fellow students for all the help!
Line of Dialog
I had been waiting for this assignment since the day I started Animation Mentor: Acting!!!!.
Well at last I was able to concentrate on making the character express emotion. Still with just a few face control, but acting never the less. acting was important on the previous assignment but I was still too distracted by the body mechanics.
As on the others I taped some video reference but this one have some interesting information I do want to share with you:
First of all, this animation thing can be addictive and if you are not careful you will gain wight, so first lesson, reserve time for exercise. I have gained about 20 pounds since I started AM.
Ok... I want you to pay attention to the text... the white one is what the character is saying, the black one is what the character might be thinking, what they call the subtext. The interesting thing about that is that one should not animate the words but the thoughts, the ideas. that helps a lot when making acting choices.
This is one of the first blocking:
I had to many similar hand gestures and some of them where a little bit cliche, so I decided with the help of my mentor to brake it up a little bit more.
When I went to spline I encounter my first gimble lock in Animation Mentor. It is definitively a not fun thing to have, but I managed to get around it.
Well, and with this I got to the end of class 3. :D
Pantomime
This one was a challenge. I had to try to recreate a scene and express contrasting emotions without facial expression, just pure body animation. I acted out the actions in front of the mirror and in front of the camera to use it as a reference and came up with this blocking:
I had a lot of fun animating the waiter which worked like magic from the beginning. but the other guy was a different story. I had to take in consideration that only one of my character should be doing something important at a time to make the silent dialog work, but I wanted the main guy to do so much stuff that the animation was getting to busy. at the end I had to delete a lot of the details I had him doing to make the animation more readable and believable. Moving holds was another thing that I had to learn how to achieve. Too still and you would perceive the character as rigid or dead, too much motion and it would not be a moving hold, to even motion on the holds and it would feel to CG. Moving hold can be tricky.
I had a lot of fun animating the waiter which worked like magic from the beginning. but the other guy was a different story. I had to take in consideration that only one of my character should be doing something important at a time to make the silent dialog work, but I wanted the main guy to do so much stuff that the animation was getting to busy. at the end I had to delete a lot of the details I had him doing to make the animation more readable and believable. Moving holds was another thing that I had to learn how to achieve. Too still and you would perceive the character as rigid or dead, too much motion and it would not be a moving hold, to even motion on the holds and it would feel to CG. Moving hold can be tricky.
Heavy Object
This one was a lot of fun to do, and I was very pleased with the result. I focussed on contrast and reversing of the arcs. I still was trying to find the work flow that best fit my way o working so again I decided to try a different planning approach. This time I turned to this book:
"Simpified Drawing for Planning Animation" by Wayne Gilbert which is an excellent source of information (and inspiration) for this and use this style:


you might think is too simple, but it has all the information I need and can be done much quicker, and even then offers additional information about the forces involved in the action. Lets you experiment more and at the same time it will not hurt you to through away pages of exploring done in minutes.
This is the blocking:
This time I decided to use a different approach to take the blocking to spline. I decided instead on use the copy pair where you just duplicate some keys to hold the pose I was going to create more brakedown keys (keys that are not essential for the animation but help define the arcs and path of action). I think I hit gold with this one. It works just as well as the copy pairs but you are adding more information to your animation taking away controll from the computer. I felt like a kid on Christmas day when I wen from blocking to spline and the transition went perfect.
With this one I finished class 2. Yessss!
The Jump
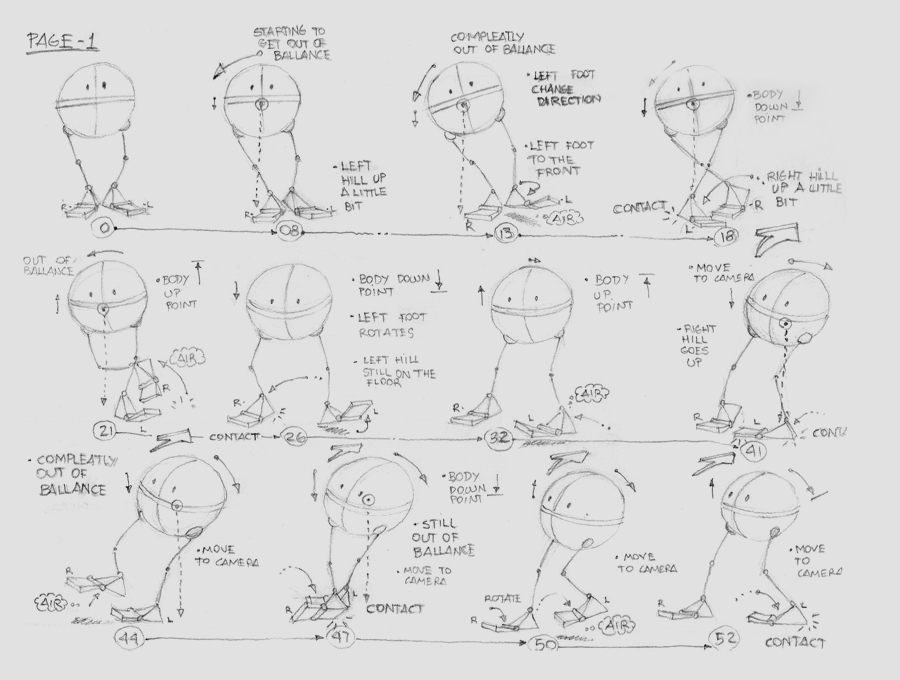
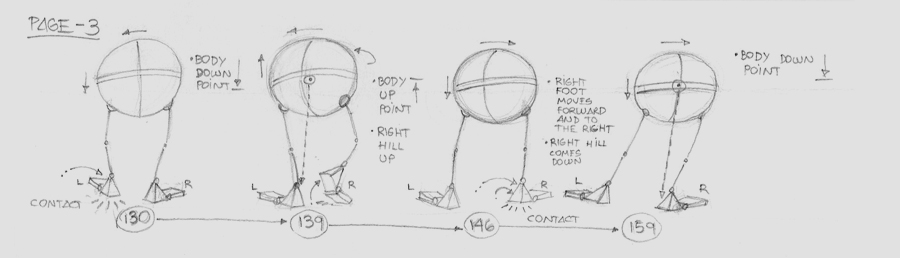
This one was a tricky one for me. I was trying to be more cartoony and exaggerated, and decided to experiment with things I had never try before like making the character walk on air and stuff like that. It was not as successfully as I wish it should be, but still I learned a lot with this one. Here is the planning.
Because I was still trying to come up with a better formula for my planning I tried on this one to go with a different style of sketches and less written information:

I really felt comfortable drawing this planning, it had enough information, yet very easy to sketch.
At the end I decided to simplify the animation, but that is the good thing about planning on paper, it is much easier to through away some quick drawings that a few hours of keyframing. Here is the blocking:
I had a lot of problem animating the spine, because I was not very carefull with the rotation of the joints and became very unpredictable.
This time I used copy pairs (repeated keys to hold the position) to go from stepped mode to spline and made the transition a lot less painful. I could actually see the poses on my splined version.
Drunk Turn
Ok... Back to Animation Mentor.
I want so show you some of the planning and process that took place to achieve the animations on class 2 and 3. Because I will latter show my progress reel I will put the spline version just of those animations that show something different from the final version
DRUNK TURN:
This one was my first real planning for an animation and I wen a little bit overboard with it


as you can see maybe I spent to much time and put too much information on the planning, but at the en it payed off. This is one of the blocking versions I made
As you see, this animation, as well as the rest that follow this one were done with the pose to pose method. It is interesting to note how much detail can be added on the blocking face, because you want to take away the control from the computer as much as possible.
This is the spline version... I'm showing it because on this version the bottle was still there (I decided not to use it on the final version).
The transition from blocking to spline has been always my weakness. It is always painful to see how your animation gets so floaty when you get out of the stepped mode (hold mode on other applications). It is a lot of work to get the spline to have the same timing feel as the blocking version. At this point I knew I had to find a better way of doing this.
I want so show you some of the planning and process that took place to achieve the animations on class 2 and 3. Because I will latter show my progress reel I will put the spline version just of those animations that show something different from the final version
DRUNK TURN:
This one was my first real planning for an animation and I wen a little bit overboard with it

as you can see maybe I spent to much time and put too much information on the planning, but at the en it payed off. This is one of the blocking versions I made
As you see, this animation, as well as the rest that follow this one were done with the pose to pose method. It is interesting to note how much detail can be added on the blocking face, because you want to take away the control from the computer as much as possible.
This is the spline version... I'm showing it because on this version the bottle was still there (I decided not to use it on the final version).
The transition from blocking to spline has been always my weakness. It is always painful to see how your animation gets so floaty when you get out of the stepped mode (hold mode on other applications). It is a lot of work to get the spline to have the same timing feel as the blocking version. At this point I knew I had to find a better way of doing this.
The Mech
First of all, I will start posting animations I do, even if they are not part of Animation Mentor, because I feel that everything I do now is based on what I learn there.
I have another blog where I was posting those kind of materials, but obviously one blog is more than enough for me. so let me star with one that is already on that other blog. Is an animation of a robot (mech) I made at work (www.giantoctopus.com). I was starting class 2 when I did it, so there are a few things I see now I didn't see them. On this first one I applied all everything I learned about weight with the bouncing ball and balance with the walk exercise. what I feel is lacking the most are the tentacles, it was beyond the scope of what I had learned up to that point:
Been the only 3D guy on the company I had to do everything from scratch, model, rig, animation and simulation (3D done with Cinema 4D and water simulation with realflow)
As you can see, the momentum and inertia of the tentacles is not enough in relationship with the big motion of the mech, so it could use more overlap of joints and follow trough of the motion as well as better arcs. But anyways I was very happy of what I could achieve with what I had learned.
This is another version of the same animation, this time without the tentacles:
Monday, January 15, 2007
Reviving the Blog
Wow... I have been very busy, and have neglected the blog for too long. Ok, it is time now to revive it!.
My last blog was when I finished Animation Mentor class 1, well I have finished class 2 and 3 and just started class 4. This has been an amazing ride and still going!.
Because I will be talking about assignments I have already made, so I will get into less details than the ones in class 1, but still will try go through the most important aspects I can remember....So, lets start.
Subscribe to:
Posts (Atom)